Don't forget to claim your June discount code!
You can also find the codes in the header of my shop.
http://dutchsvgdesigns.etsy.com
Welcome
Custom orders
*** AT THIS MOMENT I CAN'T TAKE CUSTOM ORDERS ***
26 June 2016
New text cutting files "grandma" and "grandpa"
New text cutting files "grandma" and "grandpa"
http://etsy.me/28UzGjc
http://etsy.me/28XDM07
Do you want this file in another font or text format? Don't hesitate to contact me or request a custom order in my shop.
http://etsy.me/28UzGjc
http://etsy.me/28XDM07
Do you want this file in another font or text format? Don't hesitate to contact me or request a custom order in my shop.
Text cutting file "Live"
New text cutting file "Live" in my shop
http://etsy.me/28WF6xp
Do you want this file in another font, text format or maybe add another sentence? Don't hesitate to contact me or request a custom order in my shop.
http://etsy.me/28WF6xp
Do you want this file in another font, text format or maybe add another sentence? Don't hesitate to contact me or request a custom order in my shop.
18 June 2016
How to import a SVG file in Cricut Design Space
If you buy a file in my Etsy shop, you will get a JPG PNG DXF EPS and SVG file.
If you use Cricut Design Space, the best file to use is the SVG file because this is a layered file and you will be able to cut in parts.
I will use this file for this tutorial: http://www.etsy.com/listing/399634539
How to import a SVG file in Cricut Design Space
Click this link https://us.cricut.com/design and login with your username or password or make an account.
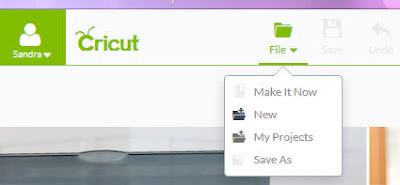
At the top of the page you see "File", click on it and click on "New"
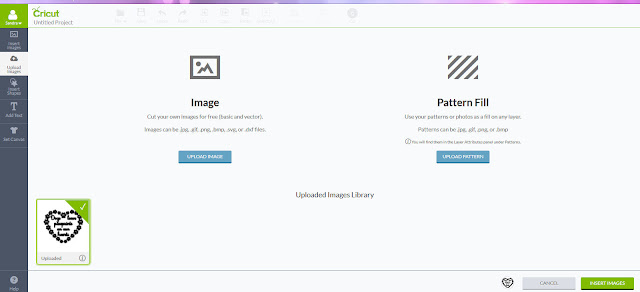
Click on "Upload image" (blue button)
And then click "Browse".
Click the image (left) so it will be checked and is green and click "Insert image".
Right click while the image is selected and click "Ungroup".
On the right side of your screen you see all the layers you can cut separate if you wish to cut in more than one color.
I hope this tutorial was useful.
If you use Cricut Design Space, the best file to use is the SVG file because this is a layered file and you will be able to cut in parts.
I will use this file for this tutorial: http://www.etsy.com/listing/399634539
How to import a SVG file in Cricut Design Space
Click this link https://us.cricut.com/design and login with your username or password or make an account.
At the top of the page you see "File", click on it and click on "New"
 |
Click on "Upload image" (blue button)
And then click "Browse".
Search your SVG file and click "Open".
Now you will see this screen.Click SAVE on the right side.
Click the image (left) so it will be checked and is green and click "Insert image".
Right click while the image is selected and click "Ungroup".
On the right side of your screen you see all the layers you can cut separate if you wish to cut in more than one color.
I hope this tutorial was useful.
If you have any questions, don't hesitate to contact me!
10 June 2016
Extra information on the mermaid cutting file
This tutorial is made for the mermaid file: http://www.etsy.com/listing/399021941
Open the image in your favorite cutting software.
Recolor the image if you wish or use my image. Recoloring has no use for cutting but will be an example of what your image will look like and will help you to cut by color.
I always work with a copy of a file, so you won't lose any data
The image will be cut in parts, so you have to puzzle them back again once they are cut. Use the original image on your screen to see where you have to put the parts.
I am not able to download Cricut DS, so I can't help you with this software. Although I think it will work almost the same as described for the other software.
Silhouette Studio (studio3 file)
The black silhouette is used for the background, depending on what background you will use you can decide if you will need it. If you don't want to use it, put it to the side or delete it.
Right click and degroup the mermaid file to recolor.
You can select and sort the parts by color holding the SHIFT key. I group (right click and select group) the parts of one color and put them to the side, go to the next color and so on.
Now you can cut by color. Remember that everything on the mat will be cut so keep everthing you want to cut later outside the mat.
Inkscape (SVG)
Click on the colored image and move a little bit. Decide if you want to use the black silhouette, if not click and delete.
Click the colored file, right click and ungroup. Recolor if you wish.
You can select and sort the parts by color holding the SHIFT key. I group (right click and select group) the parts of one color and put them to the side, go to the next color and so on.
Now you can cut by color.
Sure Cuts a Lot (SVG and EPS)
Right click on the image and degroup. Go to the layers pallet and click the arrow. Search for the black silhouette background and click it.
Go to the image, the black silhouette is selected so you can move it to the side. Decide if you want to use the black silhouette, if not click and delete.
Go to the colored file and recolor if you wish.
You can select and sort the parts by color holding the SHIFT key. I group (right click and select group) the parts of one color and put them to the side, go to the next color and so on.
Now you can cut by color. Remember that everything on the mat will be cut so keep everthing you want to cut later, outside the mat.
For all programs, this is what it will look like if you sorted parts by color.
And this is what a finished file looks like. Of course you can choose any color you want and make lots of different lovely mermaids!
If you have any questions, send me a convo at Etsy or contact me here with the contact form on the right side.
Subscribe to:
Comments (Atom)


