Welcome

Custom orders

*** AT THIS MOMENT I CAN'T TAKE CUSTOM ORDERS ***

06 October 2016

Halloween lantern tutorial

This is a tutorial on the Halloween lantern cutting file
http://www.etsy.com/listing/469948374

This file includes a JPG, PNG, STUDIO3, SVG, EPS and DXF file.
Also read this blogpost "What file to use for which software", and take a look at the second table "Best files to open".

Cut the file format of your choice and you will have 2 parts.

If you want to add vellum on the inside, cut and glue this first. In stead of vellum I sometimes use greaseproof paper.

Fold all folding lines and glue the sides.
When the glue is dry follow these steps to close the bottom:

Fold this part down

Put the points inside

And put the last part in
 

Close the bats by sliding them into each other

After closing all 4, first hold the loops together and fold the 2 other parts over the loops.

And your lantern is ready!

Never use real candles or fire!

If you have any questions, don't hesitate to contact me!

16 September 2016

14 September 2016

Buy your favorite cutting files on this blog

I added a webshop section to this blog, now you will be able to shop directly from this blog.
Pick the file or files you like, add it to your cart, make a payment and download directly.
You will be able to pay through Paypal or any major credit/debit card.

Do you prefer another payment option? Please visit my Etsy shop http://dutchsvgdesigns.etsy.com

13 September 2016

Halloween cutting files

While I am writing this it is really hot weather in the Netherlands, the hottest 13th of September ever!
Really strange to work on Christmas and Halloween files now...
The Halloween files are online. More files soon!
Click here to go to the Halloween section


#halloween #halloweensvg #halloweencuttingfile #svg #svgfile #svgcuts #svgcuttingfile #epsfile #dxffile #jpgfile #pngfile #silhouettestudio #silhouettecameo #cricut #cricutexplore #cricutdesignspace

26 June 2016

June discount codes

Don't forget to claim your June discount code!
You can also find the codes in the header of my shop.
http://dutchsvgdesigns.etsy.com


New text cutting files "grandma" and "grandpa"

New text cutting files "grandma" and "grandpa"
http://etsy.me/28UzGjc
http://etsy.me/28XDM07

Do you want this file in another font or text format? Don't hesitate to contact me or request a custom order in my shop.


Text cutting file "Live"

New text cutting file "Live" in my shop
http://etsy.me/28WF6xp

Do you want this file in another font, text format or maybe add another sentence? Don't hesitate to contact me or request a custom order in my shop.


18 June 2016

How to import a SVG file in Cricut Design Space

If you buy a file in my Etsy shop, you will get a JPG PNG DXF EPS and SVG file.
If you use Cricut Design Space, the best file to use is the SVG file because this is a layered file and you will be able to cut in parts.

I will use this file for this tutorial: http://www.etsy.com/listing/399634539


How to import a SVG file in Cricut Design Space
Click this link https://us.cricut.com/design and login with your username or password or make an account.
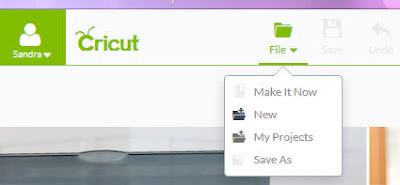
At the top of the page you see "File", click on it and click on "New"
Import SVG in Cricut Design Space
On the left side you will see "Upload images", click on it.
Import SVG in Cricut Design Space

Click on "Upload image" (blue button)
Import SVG in Cricut Design Space - upload image

And then click "Browse".
Search your SVG file and click "Open".
Now you will see this screen.Click SAVE on the right side.
Import SVG in Cricut Design Space

Click the image (left) so it will be checked and is green and click "Insert image".
Import SVG in Cricut Design Space - insert image

Right click while the image is selected and click "Ungroup".
Import SVG in Cricut Design Space - ungroup

On the right side of your screen you see all the layers you can cut separate if you wish to cut in more than one color.

I hope this tutorial was useful.
If you have any questions, don't hesitate to contact me!


10 June 2016

Extra information on the mermaid cutting file

This tutorial is made for the mermaid file: http://www.etsy.com/listing/399021941

Open the image in your favorite cutting software.
Recolor the image if you wish or use my image. Recoloring has no use for cutting but will be an example of what your image will look like and will help you to cut by color.
I always work with a copy of a file, so you won't lose any data

The image will be cut in parts, so you have to puzzle them back again once they are cut. Use the original image on your screen to see where you have to put the parts.

I am not able to download Cricut DS, so I can't help you with this software. Although I think it will work almost the same as described for the other software.

Silhouette Studio (studio3 file)
The black silhouette is used for the background, depending on what background you will use you can decide if you will need it. If you don't want to use it, put it to the side or delete it.
Right click and degroup the mermaid file to recolor.
You can select and sort the parts by color holding the SHIFT key. I group (right click and select group) the parts of one color and put them to the side, go to the next color and so on.
Now you can cut by color. Remember that everything on the mat will be cut so keep everthing you want to cut later outside the mat.

Inkscape (SVG)
Click on the colored image and move a little bit. Decide if you want to use the black silhouette, if not click and delete.
Click the colored file, right click and ungroup. Recolor if you wish.
You can select and sort the parts by color holding the SHIFT key. I group (right click and select group) the parts of one color and put them to the side, go to the next color and so on.
Now you can cut by color.

Sure Cuts a Lot (SVG and EPS)
Right click on the image and degroup. Go to the layers pallet and click the arrow. Search for the black silhouette background and click it.
Go to the image, the black silhouette is selected so you can move it to the side. Decide if you want to use the black silhouette, if not click and delete.
Go to the colored file and recolor if you wish.
You can select and sort the parts by color holding the SHIFT key. I group (right click and select group) the parts of one color and put them to the side, go to the next color and so on.
Now you can cut by color. Remember that everything on the mat will be cut so keep everthing you want to cut later, outside the mat.

For all programs, this is what it will look like if you sorted parts by color.

And this is what a finished file looks like. Of course you can choose any color you want and make lots of different lovely mermaids!

If you have any questions, send me a convo at Etsy or contact me here with the contact form on the right side.

27 May 2016

Why are JPG and PNG files black and white

If you make an order at my Etsy shop, you are able to download a ZIP file after payment.
In this file are JPG and PNG files in black and white/transparent and some people asked why.
Because I make cutting files, I made the JPG and PNG files black and white because these files are better to trace.
Do you want them colored for use as a printable or anything else? Please contact me and I will make the colors you want!

02 May 2016

Using SVG and EPS files in more than one color

Some extra information on my layered SVG and EPS files:
Depending on the software you use, you sometimes need to degroup before you can cut in more than one color.
In most software you can choose this option (degroup) if you right click on the selected image.
Now you can move parts to cut by color.
Do you want a file in one color, leave it as it is.

If you have any questions about this, don't hesitate to contact me!

30 April 2016

Silhouette Studio tutorial - butterflies

Hi and welcome to my first tutorial!
If you miss a step, just let me know.
If you have any questions, you can contact me on the right side of this page.

This tutorial is made for this file http://etsy.me/1ppZs76
But works the same for other layered files.


If you have bought the file and open it in Silhouette Studio, you will only see the outlines.
If you cut this file now, all white parts will fall out, you will have a cutout butterfly.

This tutorial is for a layered butterfly.
Fill the one wing butterfly
(Filling will have no effect on cutting, it is just to show what happens to the image)

Put the purple one to the side and center the pink one to the page.
Select the image, right click and choose Release Compound Path

After that you will see this.

Keep all parts selected and go to the fill color window to make the image transparent. Keep the lines colored, the best color is black.

Hold your shift key and click with your mouse on the parts you want to cut in the same color.

Start with all the inside parts.
Filling has no effect on cutting, it is just to sort the colors for cutting.

Then fill the outside. Don't worry, all the other colors are still there.

Move the green part to the side and go back to the inside colors.
If you are happy with the result, hold the shift key and select all parts with the same color.
Right click and choose Group.
Do this with all the colors, make 1 group for every color.

Move all parts and cut by color

This file can be used with e.g. paper, vinyl and heat transfer.


I always like to see what you have created. Send me your pictures and let me know if they are private or if I may place them here.
To prevent spam, I don't want to place my email address here. Please send them through my facebook page by a private message http://www.facebook.com/dutchsvgdesigns
Or contact me on the right side of the page and ask for my email address.
Thank you!

13 April 2016

Summer cutting files

Rose cutting file in the shape of a heart

Welcome

Welcome and thank you for visiting my blog!
On my blog you will find some extra information on the items in my Etsy webshop
http://dutchsvgdesigns.etsy.com.

Custom orders are welcome! 
Send me a convo or request a custom order in my shop.

If you have any questions about my files, please don't hesitate to contact me!